Fission and Istio Integration
Tutorial for how to integrate Fission with Istio
Table of Contents
Fission is a framework for serverless functions on Kubernetes. Istio is an open platform to connect, manage, and secure microservice announced by Google, IBM and Lyft. It makes sense to combine them together to provide user more powerful functionalities.
Since this is the very first step for fission to integrate with Istio, there are still couple problems need to be solved. For those interested in trying to integrate fission with istio, following is the set up tutorial.
- Google Kubernetes Engine: 1.9.2-gke.1 cluster
- Fission: 0.6.0
- Istio: 0.6.0
Available zone can be found here
$ export ZONE=<zone name>
$ gcloud container clusters create istio-demo-1 \
    --machine-type=n1-standard-2 \
    --num-nodes=1 \
    --no-enable-legacy-authorization \
    --zone=$ZONE \
    --cluster-version=1.9.2-gke.1
Grant admin permission for system:serviceaccount:kube-system:default and current user.
# for system:serviceaccount:kube-system:default
$ kubectl create clusterrolebinding --user system:serviceaccount:kube-system:default kube-system-cluster-admin --clusterrole cluster-admin

# for current user
$ kubectl create clusterrolebinding cluster-admin-binding --clusterrole=cluster-admin --user=$(gcloud config get-value core/account)
For Istio 0.6.0 you can follow the installation tutorial below. Or you can follow the latest installation guides on Istio official site: Quick Start and Sidecar Injection.
Download Istio 0.6.0
$ export ISTIO_VERSION=0.6.0
$ curl -L https://git.io/getLatestIstio | sh -
$ cd istio-0.6.0/
Apply istio related YAML files
If you want to install istio without enabling mutual TLS authentication:
$ kubectl apply -f install/kubernetes/istio.yaml
Or, enabling mutual TLS authentication between istio-proxy:
$ kubectl apply -f install/kubernetes/istio-auth.yaml
Automatic sidecar (istio-proxy) injection
Please make sure that admissionregistration API is enabled.
$ kubectl api-versions | grep admissionregistration
admissionregistration.k8s.io/v1beta1
Install the sidecar injection configmap.
$ ./install/kubernetes/webhook-create-signed-cert.sh \
    --service istio-sidecar-injector \
    --namespace istio-system \
    --secret sidecar-injector-certs

$ kubectl apply -f install/kubernetes/istio-sidecar-injector-configmap-release.yaml
Install the sidecar injector
$ cat install/kubernetes/istio-sidecar-injector.yaml | \
     ./install/kubernetes/webhook-patch-ca-bundle.sh > \
     install/kubernetes/istio-sidecar-injector-with-ca-bundle.yaml

$ kubectl apply -f install/kubernetes/istio-sidecar-injector-with-ca-bundle.yaml

# Check sidecar injector status
$ kubectl -n istio-system get deployment -listio=sidecar-injector
NAME                     DESIRED   CURRENT   UP-TO-DATE   AVAILABLE   AGE
istio-sidecar-injector   1         1         1            1           26s
Set default namespace for helm installation, here we use fission as example namespace.
$ export FISSION_NAMESPACE=fission
Create namespace & add label for Istio sidecar injection.
$ kubectl create namespace $FISSION_NAMESPACE
$ kubectl label namespace $FISSION_NAMESPACE istio-injection=enabled
$ kubectl config set-context $(kubectl config current-context) --namespace=$FISSION_NAMESPACE
Install fission with following command:
$ helm install --namespace $FISSION_NAMESPACE --set enableIstio=true --name istio-demo https://github.com/fission/fission/releases/download/0.6.0/fission-all-0.6.0.tgz
Set environment
$ export FISSION_ROUTER=$(kubectl --namespace fission get svc router -o=jsonpath='{..ip}')
Let’s create a simple function in Node.js.
Create environment
$ fission env create --name nodejs --image fission/node-env
Create function
// hello.js
module.exports = async function(context) {
    console.log(context.request.headers);
    return {
        status: 200,
        body: "Hello, World!\n"
    };
}
$ fission fn create --name h1 --env nodejs --code hello.js --method GET
Create route
$ fission route create --method GET --url /h1 --function h1
Access function
$ curl http://$FISSION_ROUTER/h1
Hello, World!
NOTE: Due to a known issue with Istio 0.6.0, right now the Grafana & Jaeger can only display TCP-level information.
- Prometheus
$ kubectl apply -f install/kubernetes/addons/prometheus.yaml
$ kubectl -n istio-system port-forward $(kubectl -n istio-system get pod -l app=prometheus -o jsonpath='{.items[0].metadata.name}') 9090:9090
Web Link: http://127.0.0.1:9090/graph
- Grafana
Please install Prometheus first.
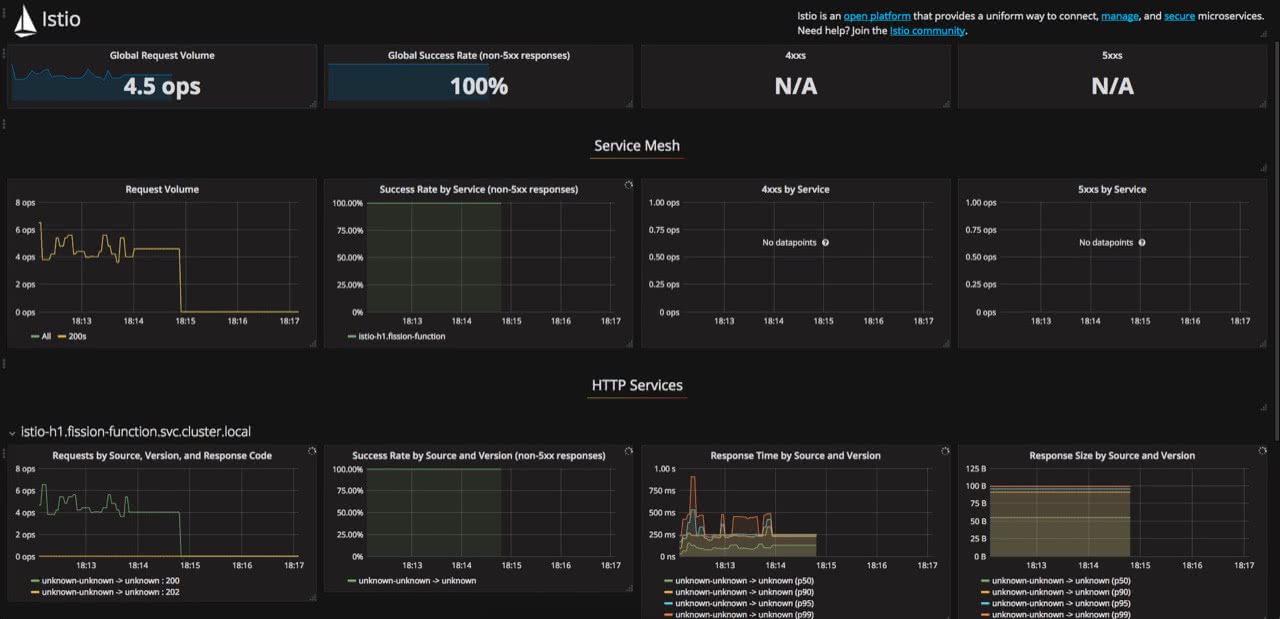
$ kubectl apply -f install/kubernetes/addons/grafana.yaml
$ kubectl -n istio-system port-forward $(kubectl -n istio-system get pod -l app=grafana -o jsonpath='{.items[0].metadata.name}') 3000:3000
Web Link: http://127.0.0.1:3000/dashboard/db/istio-dashboard
- Jaeger
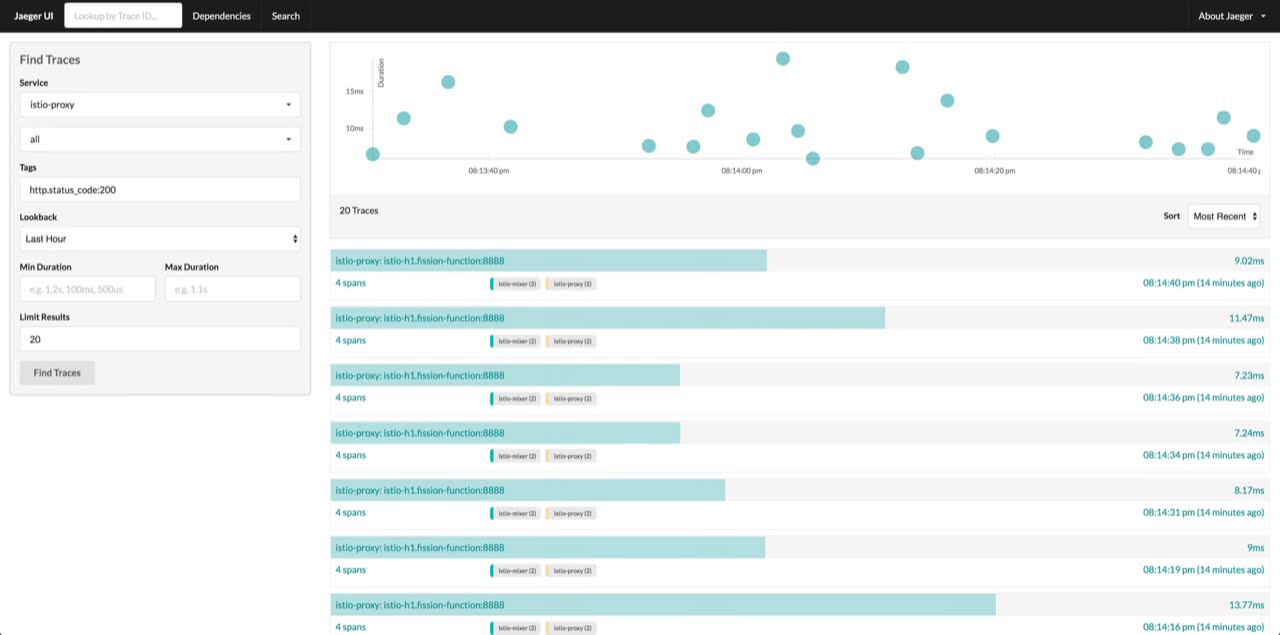
$ kubectl apply -n istio-system -f https://raw.githubusercontent.com/jaegertracing/jaeger-kubernetes/master/all-in-one/jaeger-all-in-one-template.yml
$ kubectl port-forward -n istio-system $(kubectl get pod -n istio-system -l app=jaeger -o jsonpath='{.items[0].metadata.name}') 16686:16686
Web Link: http://localhost:16686
See Also
- Fission - Serverless Framework For Kubernetes
- Adopting Container and Kubernetes in Production
- Kubernetes - Two Steps Installation
- Rolling Updates with Kubernetes Deployments
- Kubernetes - Assigning Pod to Nodes
To reproduce, republish or re-use the content,
please attach with link: https://tachingchen.com/
Twitter
Google+
Facebook
Reddit
LinkedIn
StumbleUpon
Pinterest
Email