Kubernetes Service 概念詳解
介紹 Kubernetes Service 概念及應用

文章目錄
由於 Kubernetes 的 Deployment 帶來便利性,讓開發者能夠在短時間內於多個節點上部署撰寫好的各種不同應用(application)。但該如何讓使用者能夠存取位於 Pod 上的應用,而無需考慮到不同節點的問題呢?
Service 正是 Kubernetes 解決此問題的關鍵,因此接下來文章將會為各位介紹 Kubernetes Service 的概念。
Service 是 Kubernetes 內定義的抽象化物件(object),官方網站的介紹傳神地描述它的基本(原始)用途。
A Kubernetes Service is an abstraction which defines a logical set of Pods and a policy by which to access them.
Kubernetes Service 是個抽象化的概念,主要定義了邏輯上的一群 Pod 以及如何存取他們的規則。
這邊同時也帶出幾個問題:
- 誰會使用 Service
- 什麼是邏輯上的一群 Pod
- 什麼是存取規則
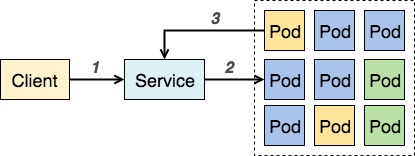
前述的三個問題,大抵上可以從上圖來獲得解釋
- 為求講解方便此處繪出 Service 作為存取的進入點,實際上並沒有稱為 Service 的程式在運作。
除外部使用者會透過 Service 存取內部 Pod 以外 (路徑 1 -> 2),同集群其他的 Pod 也有可能需要存取 (路徑 3 -> 2)。值得注意的是兩條路徑的存取方式以及存取的 IP 位址有所不同(這點後續其他文章會提及)。
簡單一句話描述就是
帶著相同標籤、做類似事情的一群 Pod
每個 Pod 本身會帶著一或多個不等的標籤在身上,當 Service 指定存取某些特定的標籤時,Label Selector 會根據 Pod 身上自帶的標籤進行分組,並回傳 Service 所要求的 Pod 資訊。
上圖右邊共有三種分別為黃、綠、藍色的 Pod,正代表著集群內有三種不同的 Pod 群組,當今天收到使用者請求時,便會將請求送至對應的藍色群組內的其中一個 Pod 進行處理。
就是如何存取該服務的規則,比方說 TCP/UDP、Port 等等相關規則。
Service 作為中介層,避免使用者和 Pod 進行直接連線,除了讓我們服務維持一定彈性能夠選擇不同的 Pod 來處理請求外,某種程度上亦避免裸露無謂的 Port 而導致資安問題。
另外,也體現出雲服務架構設計中一個非常重要的觀念:
對於使用者而言,僅須知道有人會處理他們的請求,而毋須知道實際上處理的人是誰。
接著就來介紹如何撰寫簡單的 Kunernetes Service 定義檔吧!
Service 定義檔主要涵括三個主要元素:
- 服務元資料 (Metadata)
- 被存取的應用之標籤 (Label)
- 存取該服務的方式
簡單來說就是服務的名稱,讓其他人瞭解該服務的用途
metadata:
  name: service-example
由於每個 Pod 本身會帶有一至多個標籤,如何將使用者請求送到正確的 Pod,仰賴管理者設定的標籤是否得當。
比方說,今天有 Nginx 以及 Apache 兩種網頁伺服器在運作,維運人員希望將流量導向至 Nginx,他們只要在 Pod 的 spec.selector 設定一組 app: nginx 的標籤,接著在 Service 內定義:
spec:
  selector:
    app: nginx
Service 便會根據定義檔內所設定的標籤,透過 Label Selector 找到對應的 Pod 後,建立相對應的 Iptable 規則。如此一來,當使用者請求送達 Kubernetes cluster 時,便會依照 Iptable 規則將封包繞送到實際執行的 Pod 內。
服務要開放給外界使用時,需要定義該服務的 Port、Protocol。以常見網頁伺服器來打比方:
- Port: 80、443
- Protocol: TCP
對應到 Kubernetes Service spec.ports 的寫法的話就是:
spec:
  ports:
    - name: http
      # the port for client to access
      port: 80
      # the port that web server listen on
      targetPort: 80
      # TCP/UDP are available, default is TCP
      protocol: TCP
    - name: https
      port: 443
      targetPort: 443
      protocol: TCP
而完整的 spec.ports 共包含以下幾個欄位:
- name: 讓維運人員瞭解該埠用途
- port: 對外部開放的埠號
- targetPort: 實際 Pod 所開放的埠號
- protocol (optional): 該服務使用的協定目前有 TCP/UDP 兩種,預設為 TCP
- nodePort (optional): 此設定只有在
spec.type為 NodePort 或 LoadBalancer 才會存在
接著我們把前面三個元素綜合起來:
# service-example.yaml
apiVersion: v1
kind: Service
metadata:
  name: service-example
spec:
  selector:
      app: nginx
  ports:
    - name: http
      port: 80
      targetPort: 80
      protocol: TCP
    - name: https
      port: 443
      targetPort: 443
      protocol: TCP
接著是建立第一個 Kubernetes Service
$ kubectl apply -f service-example.yaml
service "service-example" created
查看 Service 相關資料
$ kubectl get service service-example
NAME                 CLUSTER-IP      EXTERNAL-IP       PORT(S)            AGE
service-example      10.43.249.227   <none>            80/TCP,443/TCP     6s

# detailed information
$ kubectl describe service service-example
Name:			service-example
Namespace:		default
Labels:			<none>
Selector:		app=nginx
Type:			ClusterIP
IP:			10.43.254.195
Port:			http	80/TCP
Endpoints:		<none>
Port:			https	443/TCP
Endpoints:		<none>
Session Affinity:	None
No events.⏎
如此就完成了 Kubernetes 建立摟!
相關文章
- Kubernetes 兩步安裝一次上手
- Kubernetes Service 深度剖析 - 標籤對於 Service 的影響
- Kubernetes Service 深度剖析 - 存取路徑差異
- 從 Google Kubernetes Engine 移除節點
- 透過 Kubernetes Deployments 實現滾動升級
文章內容的轉載、重製、發佈,請註明出處: https://tachingchen.com/tw/
Twitter
Google+
Facebook
Reddit
LinkedIn
StumbleUpon
Pinterest
Email